
I grew up cooking with my french mother; the kitchen was the heart of our home. My food was always prepared from scratch and I often helped in it’s preparation. I am certain that this is where my love of food and cooking started and it is something I always wanted to foster in my own children.
When my son was born and we found that he had an array of allergies that we had to navigate, my love of cooking and food was replaced with an overwhelming sense of fear and anxiety. What if this causes another reaction? What if he’s up screaming in pain all night again? What if…?
I ended up doing the TED diet when my son was around 16 weeks. My diet was so limited and food became something that I was nervous about, something simply to sustain me.
It took a long while before that sense fear was gone, though I feel that the anxiety never will – even now I worry that he might get hold of something or that I haven’t checked the label carefully enough and missed an allergen. I guess that this has become a new normal for me.
My son is now 18 months and I have only recently started cooking with him. I am not sure why I hadn’t started sooner? My daughter loves cooking and will always want to get involved. Food and allergy children just seem like a volatile mix – but should it be? At the end of the day, if my son is cooking with me, I’m in control. I know exactly what goes in and how it has been prepared, so surely my anxiety is unfounded. Strange isn’t it?
Cooking with children may seem like an act of pure madness. Children plus knives, ovens and certain chaos may seem like the start of horror movie in the making and that’s before you even throw allergies into the proverbial mix. So why bother?
There are a huge number of benefits to cooking with your child, many being life long. Cooking offers children learning experiences that can support them in language, maths and science. Not only this, but it helps develop social and emotional skills, cooking something from scratch with your own hands that can then be enjoyed by yourself and others offers children a sense of accomplishment and pride. These are the feelings we want our young people to be associating with their food preparation as they can help support healthy eating patterns later in life.
My daughter (now 4 years old) started cooking with me when she was less than a year old. We would make simple bread dough or pizza. She would get her hands stuck in and enjoyed the sensation of handling this sticky substance. This kind of experience allows for the development of fine motor skills such as rolling and kneading but also language, talking about the ingredients and their colours and textures. She was cracking eggs independently by 18 months (we had chickens and therefore an abundance of eggs) and using them to make cakes, pancakes, omelettes…
You don’t need to be a great chef to cook with children. I have found some really simple, child friendly recipes and ideas as well as some ready-made mixes that you can easily do at home with children with few ingredients and little preparation.
So why not have a go? I promise you won’t regret it! Let me know how you get on by leaving me a comment or share your creation on my Facebook group TheAllergyMum – ideas for feeding an allergy family.
Allergy Friendly Pizza

This one is SO simple. I will be honest, I don’t tend to make the bases now. I used to, but I want the focus to be on the fun of adding the tomato sauce and toppings of your choice. This is my daughter’s favourite lunchtime treat, she often asks to make her own pizza for lunch.
Here is what we use:

Please note the cheese is for my daughter who does not have any allergies
This took me less than 5 minutes to set up ready for when my daughter came home from nursery. The look as she walked through door after a morning’s fun at nursery was priceless. Something so simple filled her with so much joy.


My son is gluten-free, therefore we used the Schär pizza base as it is readily available at my local supermarket. My daughter used Ocado’s own brand at only £1 for six, they contain wheat so is a no go for us, though they are dairy, soya and egg free. I keep them in the freezer and pull one out when needed. They don’t even needed to be fully defrosted before you start topping them.
I normally make my own tomato sauce which I freeze in small pots for pizza. However, I have found these nifty little pots of tomato pasta sauce by Little Dish which is just the right size to cover a pizza. My daughter loves smearing the red sauce over the base. My son has just started too, which is a joy to watch.
After that, it’s a simple matter of choosing your toppings. We went for some left over chicken breast which I sliced up, some frozen sweetcorn straight out of the freezer and some olives. I let my daughter top hers as she saw fit. After all, she would be the one eating it. I helped my son as he sprinkled the sweetcorn on.


My daughter is a cheese lover, so she has her own cheese which she uses. As we don’t use too much of the stuff these days, I buy the pre grated packets and keep it in the freezer so it’s there whenever I need it. For my son and I, we used the Asda’s Free From Mature Cheddar Alternative which melts!!!! (If you’re used to dairy and soya free cheese, you’ll know why this excites me so much). To add a little more flavour I also sprinkle on a little Nutritional Yeast too.
I pop the pizzas into a very hot pre heated oven for only about 5 minutes (after all, the bases are already cooked, so you just want the cheese to melt really). Once our pizza was cooked, I sprinkled over some basil (I have the pre cut cheat’s stuff in the freezer) and some rocket as I love the peppery kick and – voila – pizzas everyone can enjoy!
Vegan/gluten-free gingerbread men

This was a snowy day creation with my daughter. We decided we wanted gingerbread men (by we, I mean she asked and I didn’t say no).
I started to check the cupboards to see what ingredients I had as I was not going to venture out in the snow. Luckily, I try to keep my cupboards stocked with allergy friendly bits for just such occasions.
Here are the ingredients we used:
- 150g gluten-free flour
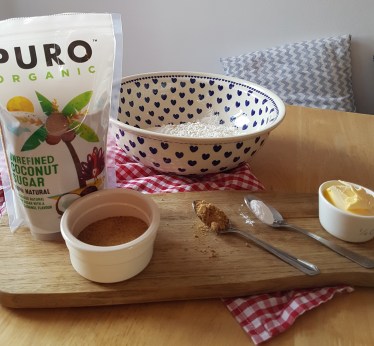
- 75g unrefined coconut sugar
- 75g butter alternative (I used Stork Gold Block)
- 1 teaspoon ginger
- 1/2 teaspoon bicarbonate of soda
Yes, that’s all. Told you it was simple


")
Method
- Preheat oven to 175°C.
- Mix the gluten-free flour, bicarbinate of soda and ginger together in a bowl.
- In a saucepan, melt the butter substitute and the sugar over a low heat, stirring occasionally.
- Add the wet ingredients to the bowl of dry ingredients and mix till combined.
- Once the ingredients are combined, form into a ball.
- Roll the dough in a little floured surface till 1cm thick.
- Cut out gingerbread men with a cutter and place onto a baking tray lined with greaseproof paper.
- You can add features such as eyes and buttons by simply pressing into the dough (I used a chopstick!)
- Bake in an oven 175°C for 10 minutes.
- Remove from oven and place carefully onto a cooling rack (the gingerbread men will still be soft but they firm up as they cool).
")
")

Vegan/ gluten-free brownies
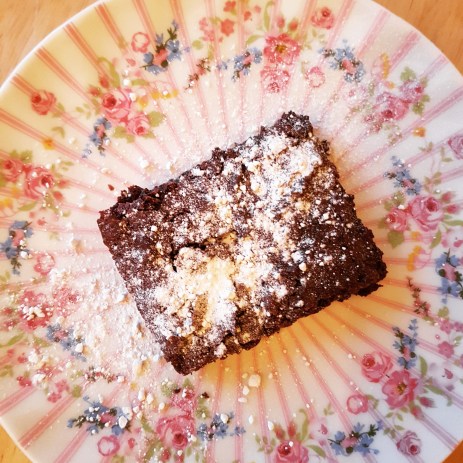
This is another super easy recipe but the results and fantastic. Moist and gooey! You only need one bowl so this also means less washing up after too.
Ingredients:
- 150g gluten free Plain flour
- 3 tablespoons of coaco powder
- 1 teaspoon gluten free baking powder
- 1 teaspoon bicarbinate of soda
- 1 teaspoon vanilla paste
- 50g butter substitute (I use vitolite)
- 50g unrefined coconut sugar
- A pince of salt
- Egg replacer equivalent to 2 eggs
- Vegan milk to loosen if required
Optional extras: vegan chocolate chip, cocoa nibs, nuts…
Method:
")

")
- Preheat oven to 200°C
- Mix the dry ingredients together in a bowl till combined.
- Add butter, vanilla paste and egg replacer with required water and mix till smooth (if needed add a small amount of vegan milk).
- Spoon mixture into a dish lined with grease proof paper.
- Bake in the oven for 20-25 minutes (check at 20 minutes and give an additional 5 minutes if needed).
- Remove from oven and allow to cool.
- Cut into squares and enjoy!
These freeze well so could be made and stored away for another day.
