
EGG FREE | DAIRY FREE | GLUTEN FREE | SOYA FREE | NUT FREE
Vegan meringues! How many of you would have imagined seeing those two words together? I remember the first time I presented a plate of these meringues to friends and said they were egg free; they looked at me like I had lost the plot. When I then added that they were in fact made from chickpea water and sugar, I was confronted by looks of horror.
Needless to say, as soon as they took a bite, they soon changed their thinking. These little beauties have a crisp outer shell and a mallowy middle that are completely delicious.
I have played around for a while trying to get a mixture that is stiff enough to hold it’s shape when baked, but still has the mallow middle I can’t resist.
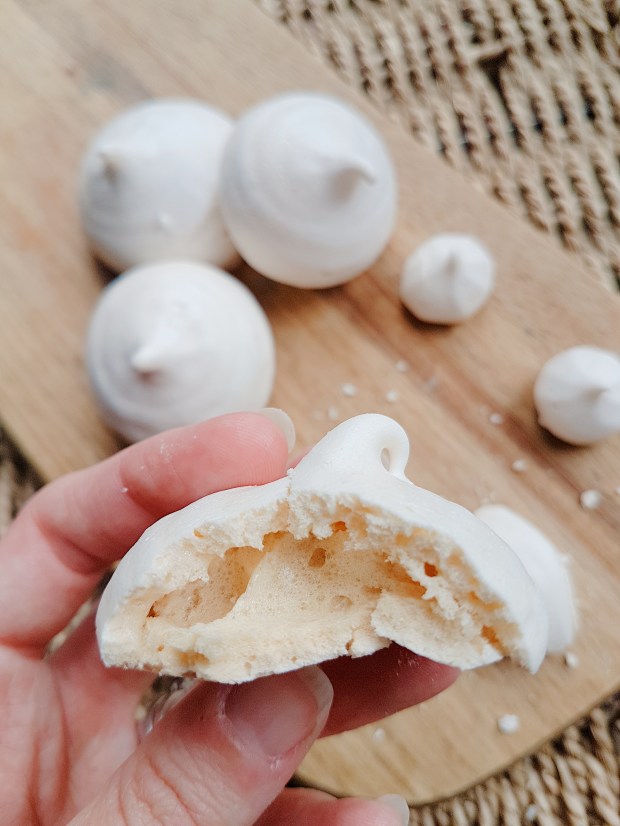
I think I’ve finally cracked it thanks to the addition of a single tablespoon of egg replacer, which seems to create a more stable mix that pipes well. You will also see that I use both caster and icing sugar, the combination of both really helping to create a soft, sticky inside but a crisp outer shell (which means you can use it to create a Pavlova without the risk of ending up with a soggy, sticky mess).
The trick to achieving a good meringue is patience, something I am not renowned for. If you put the time in, I promise you will not regret it!
INGREDIENTS
- 1 tin chickpeas in water (aquafaba)
- 75g icing sugar
- 75g caster sugar
- ½ teaspoon of vanilla paste
- 1 tablespoon egg replacer
METHOD
- Preheat the oven to 100°C
- Drain the tin of chickpeas, pouring the liquid into a mixing bowl. Save the chickpeas (I normally make hummus or use them in a curry – yum!)
- Add the egg replacer to the chickpea water (aquafaba) and mix until you see soft peaks.
- Add the vanilla paste
- Whilst still mixing, gradually add the caster and icing sugar, a tablespoon full at a time until all the sugar has been added
- Continue to mix to ensure that the sugar has been fully incorporated. You can test this by rubbing a small amount of the mixture between your thumb and finger – if you feel grains of sugar, continue to mix. The mixture needs to be smooth, firm and glossy. This can take time. I use a freestanding mixer to help.
- Spoon or pipe the mixture onto a tray lined with grease proof paper (if you use a small amount of the mixture on the corners of the paper to ‘stick’ it down, it helps when piping)
- Place into the oven for 2 hours. DO NOT open the oven door during this time.
- After the 2 hours, turn the oven off but still DO NOT open the oven door. Allow the meringues to cool for at least an hour (I normally leave them overnight)
- Remove from the oven and enjoy!

These last around a week in an air tight container but they are so moorish, they never last that long in our house.
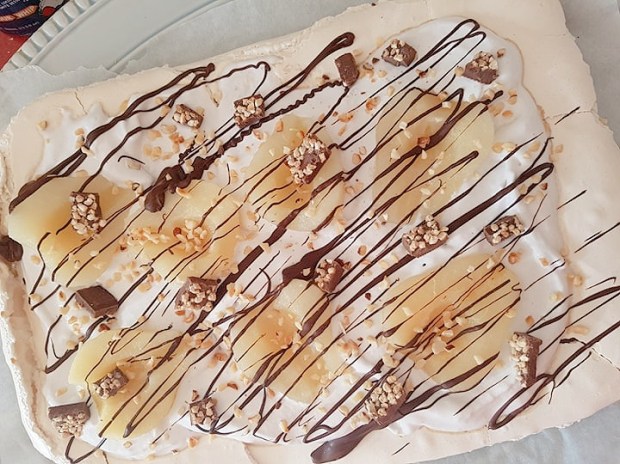
I use this recipe to make a dark chocolate, pear and hazelnut Pavlova which is always a huge hit. Using coconut whipped up with sugar to make a cream, I top with drained tinned pears, roasted hazelnuts and drizzle over with melted vegan chocolate.
This is definitely a recipe worth trying out. Not only is it incredibly cheap to make, it will be a guaranteed crowd-pleaser.
If you do try this recipe out, I’d love to hear about it!
For more allergy friendly recipes, meal ideas and food finds, follow me on Instagram at www.instagram.com/mariannetheallergymum or visit me on Facebook
Happy Eating

